
Introduction
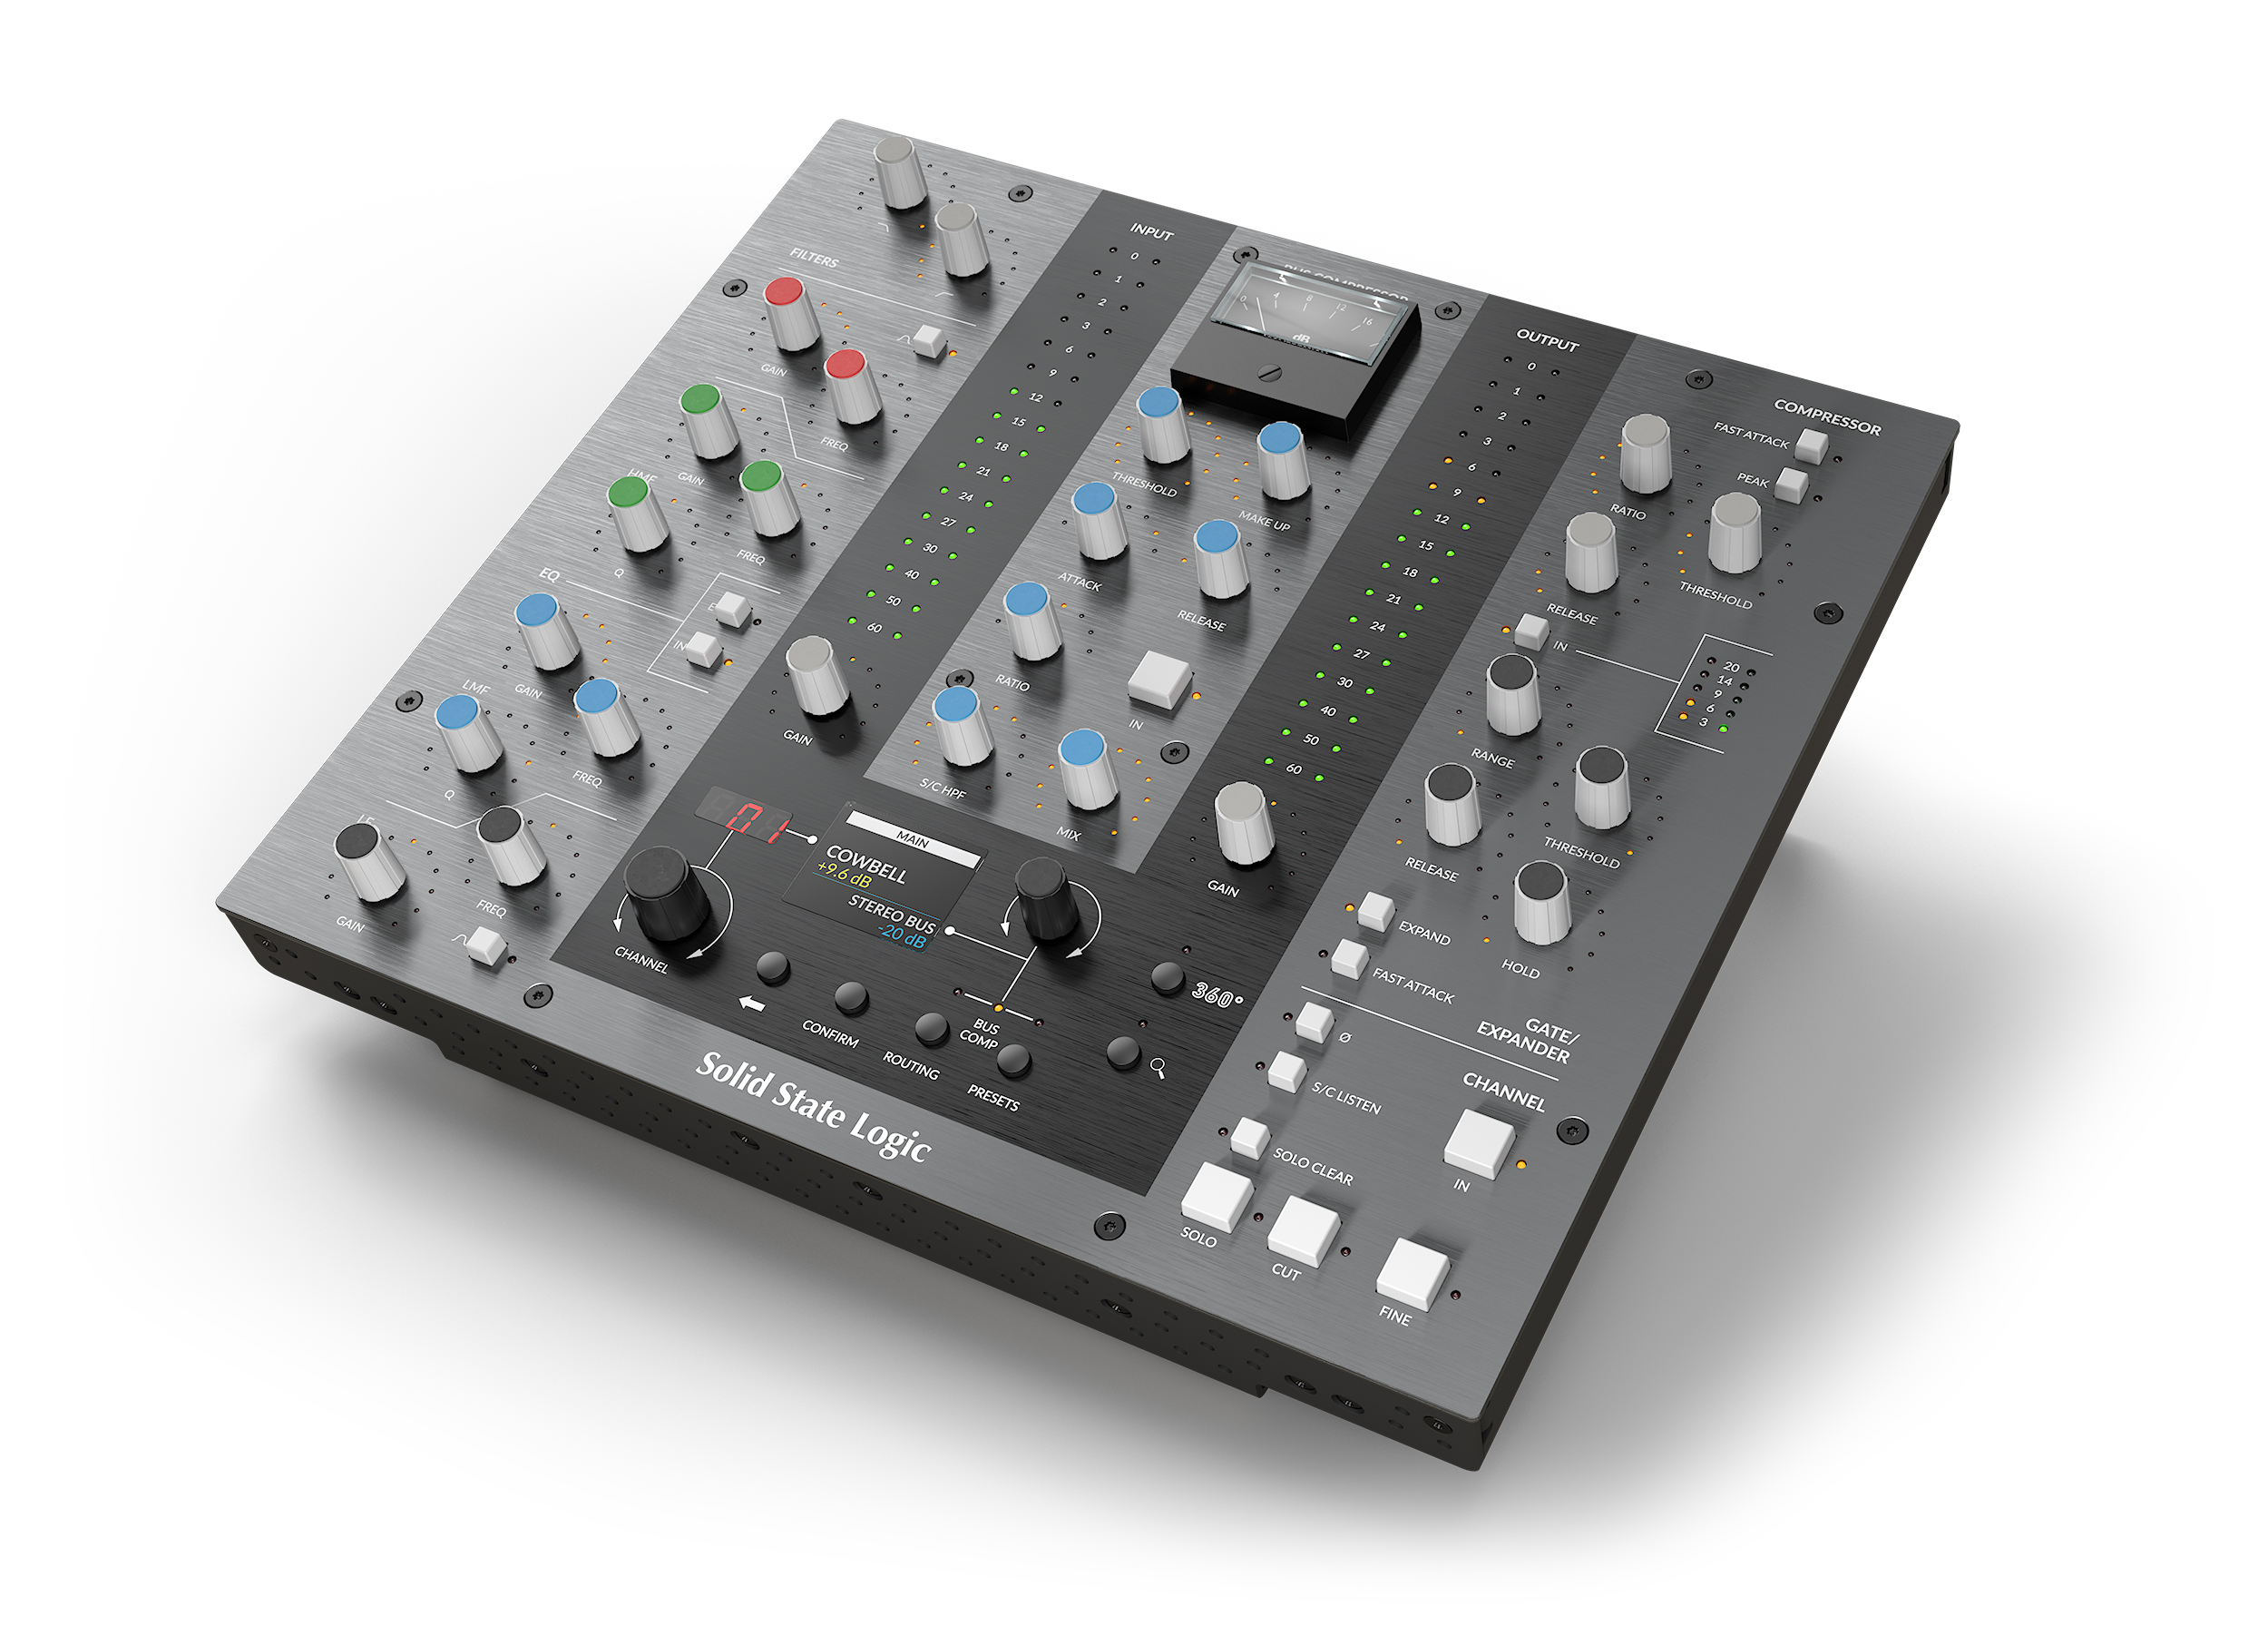
The Channel Strip 2 plug-in provides a complete SSL channel strip feature set that is based on the processing blocks of SSL's analogue consoles.
The EQ section is a classic 4-band design with parametric LMF & HMF and shelving LF & HF sections (LF & HF switch to Bell). The whole EQ can be switched between E & G Series characteristics and can be applied to the dynamics side chain.
The Dynamics section offers a separate Compressor and Gate/Expander. The Compressor can be switched between soft and hard knee. Both the Compressor and Gate/Expander sections feature fast/slow attack switches and independent side chains. The plug-in also features High and Low Pass Filters which can also be applied to the side chain. Perfect for smoothing, controlling and adding presence to any source material.
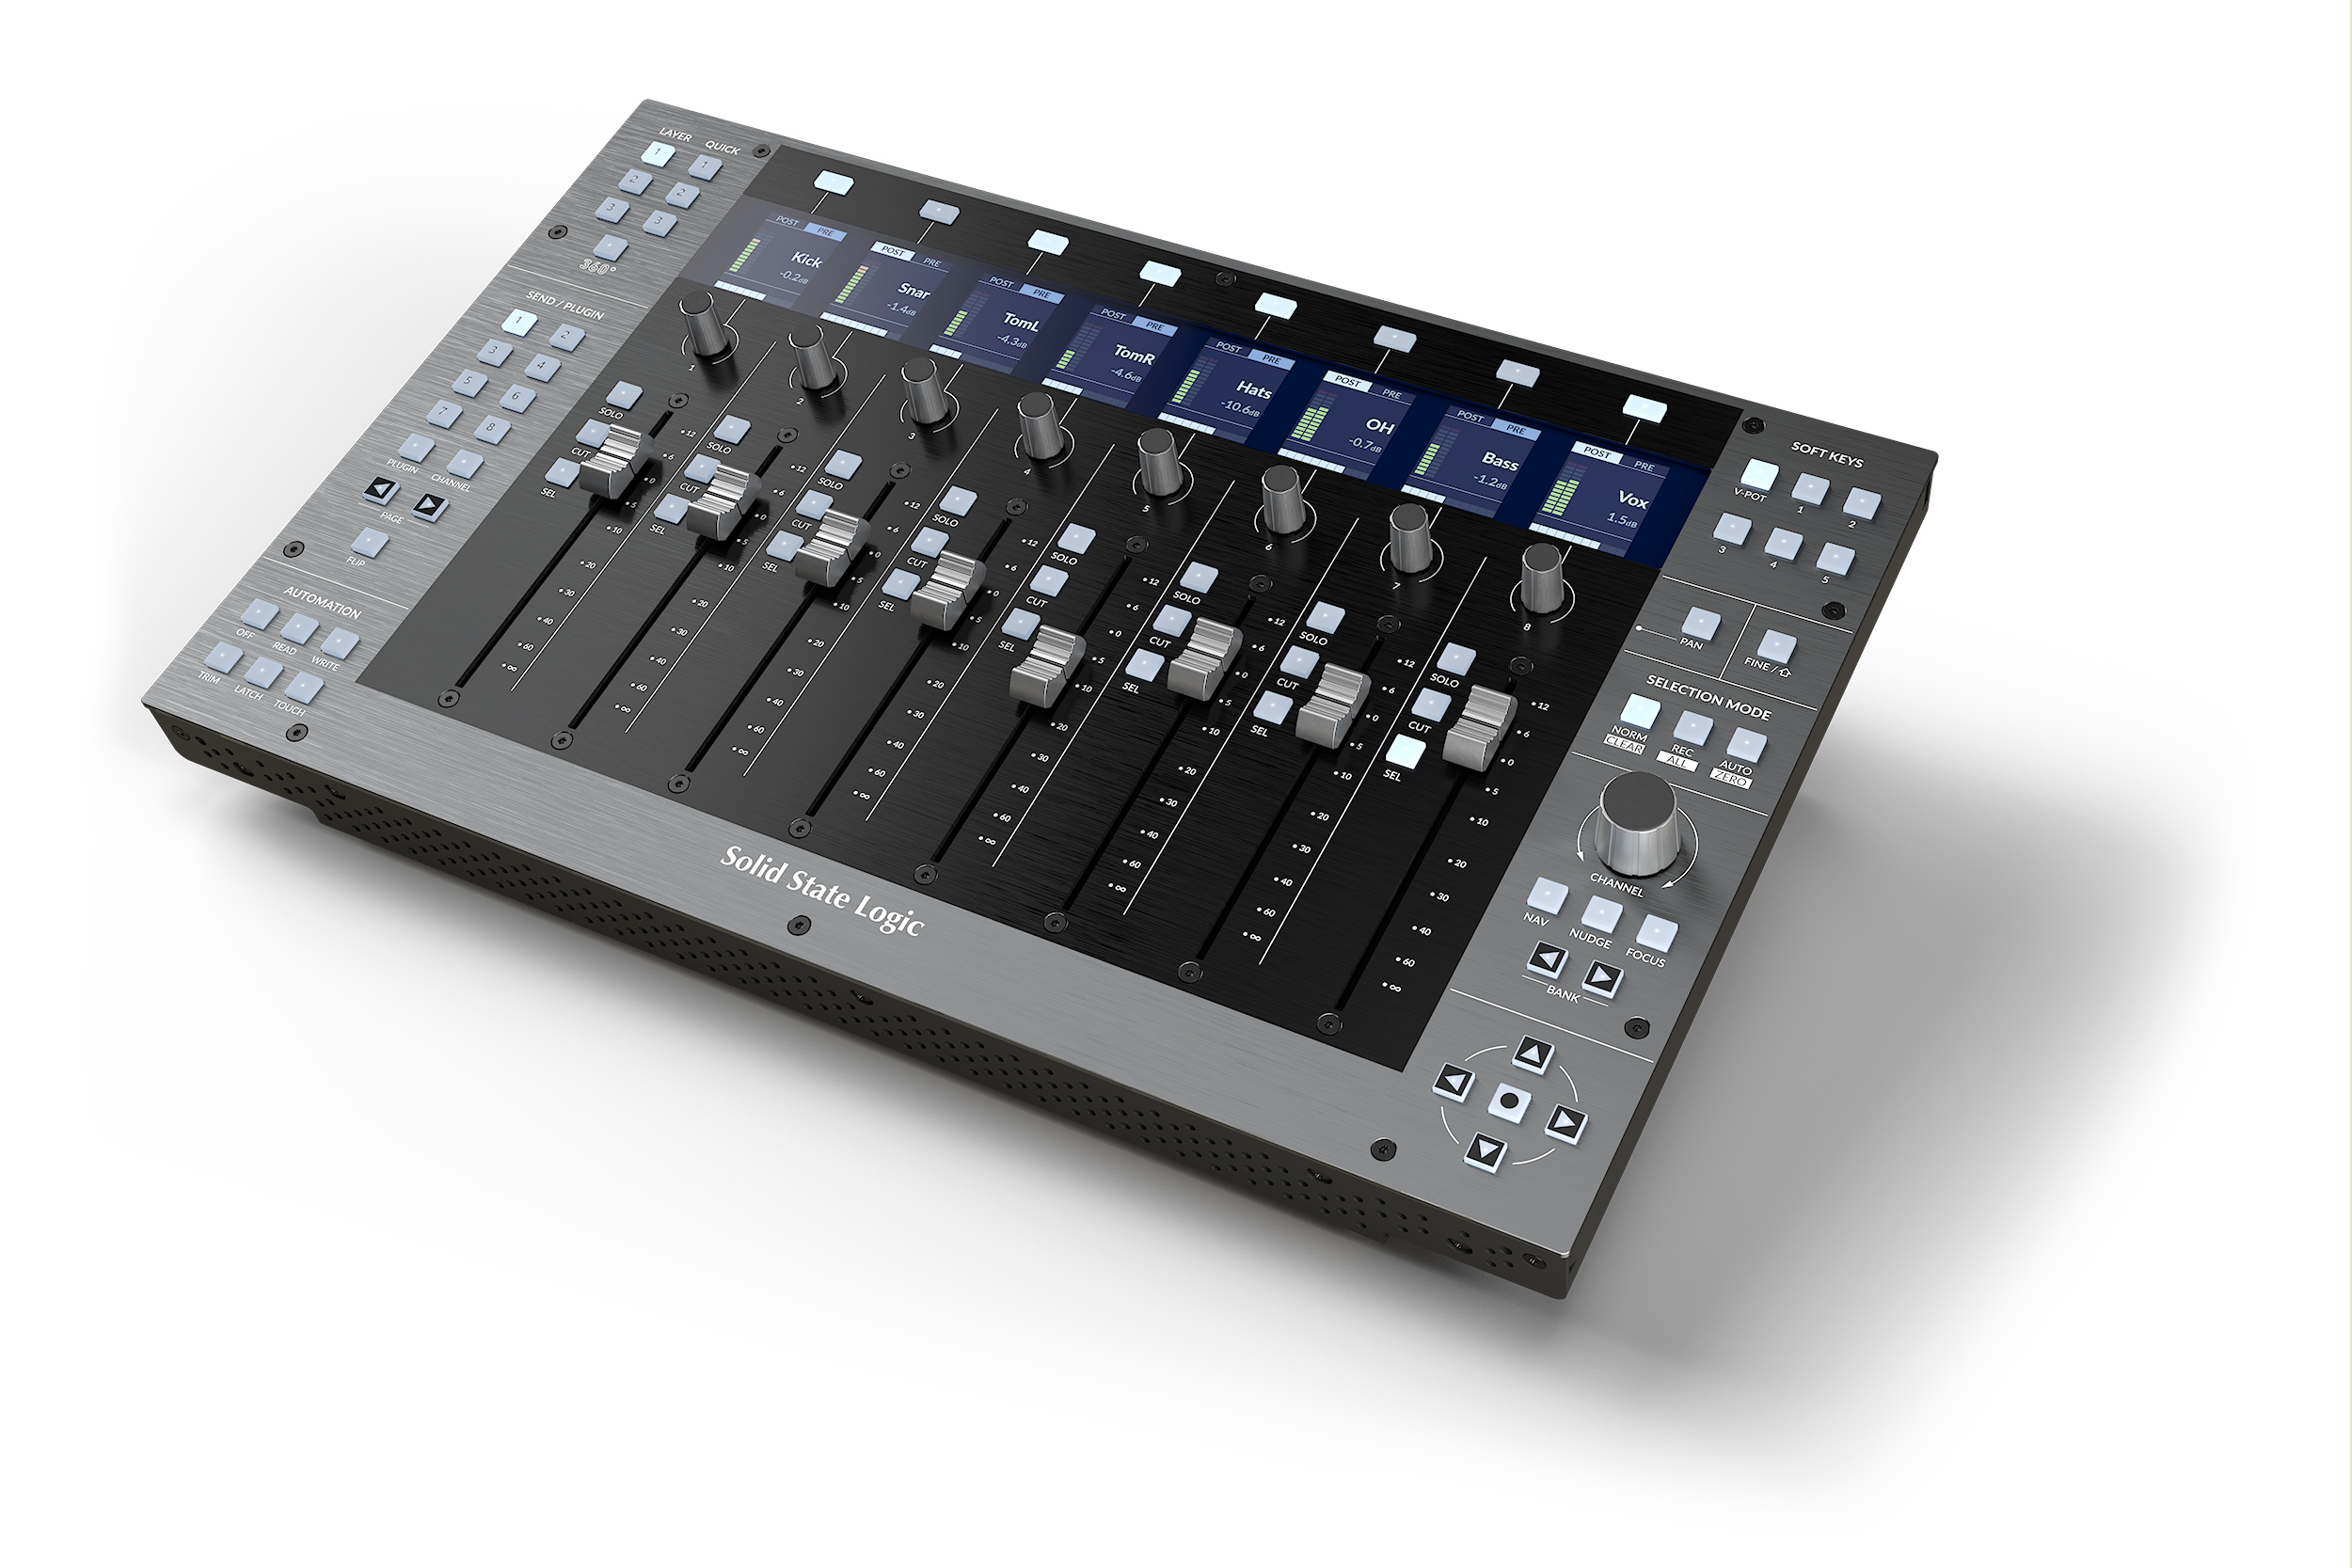
This plug-in is a 360-enabled plug-in and integrates with the SSL 360° Plug-in Mixer software, including first-class integration and hands-on control via the SSL UC1, SSL UF8 and SSL UF1 hardware controllers.
Key Features
- SSL console channel strip features, workflow and sound
- Compatible with UC1 controller
- 4-band EQ, two shelving sections and two parametric
- Variable Low-Pass and High-Pass filter
- Switchable EQ characteristics between E Series and G Series
- EQ section featuring SSL's 'Anti-Cramping' technology
- “Over-Easy” soft ratio compression characteristic for smooth transitions
- Variable process order routing
- External side-chain input
- Dynamics side-chain processing with independent side chains for compressor and expander/gate
- Compressor mix control for parallel compression
- Enhanced UC1/UF8/SSL 360° Plug-in Mixer integration for Live (VST3), Studio One (VST3) and REAPER (VST3): including DAW Track Follow and solo/cut synchronisation with your DAW
- HQ mode lets you sacrifice CPU for higher quality – introducing processing such as oversampling under-the-hood
- Pro Tools EQ and dynamics integration
- Built-in help – simply click the ‘?’ and mouseover the GUI to find out more
- Cross-platform preset management
- Undo/redo
Release Notes
For more comprehensive release notes and known issues about integration with the SSL 360° Plug-in Mixer and other hardware controllers, please refer to: SSL 360° Downloads and Release Notes
V2.1.8 (February 2023)
- New features
- (Pro Tools / AAX) Native support for Apple silicon.
- Bugfixes
-
(Ableton Live) Various Ableton Live Channel Strip 2 and 4K B fixes for Solo and Cut bugs. Automation lane no longer always reverts to the CUT parameter.
-
(Ableton Live) Switching Solo to another channel in Ableton Live no longer incorrectly clears all Solos when using Channel Strip 2 and 4K B.
-
V2.1.4 (December 2022)
- Bugfixes
- (Cubase/Nuendo/Studio One/REAPER) Resolved an issue where copy-dragging the plug-in to another channel’s insert slot caused the the track number to be duplicated, instead of changing to the correct track number.
- (Logic) Addressed a bug where the channel name displayed random extra characters in track name display of 4K B, Channel Strip 2, Plug-in Mixer and on UC1 on macOS Ventura, also causing ordering issues.
V2.0.27 (October 2022)
- New features
- Native support for Apple silicon (VST, VST3 and AU only).
- Brand new GUI and layout to match UC1.
- New parameters: Pan, Width, Fader Leve, Compressor Mix, and HQ Mode.
- (Studio One, Live & REAPER) Automatically follow select track, Solo and Cut from the DAW
- Support for the Pro Tools EQ display.
- Bugfixes
- (360° Plug-in Mixer) Addressed a bug where the Channel Strip 2 track name on UC1 and in the 360° Plug-in Mixer was not receiving extended ASCII characters from Pro Tools track names.
V1.0.55 (August 2021)
- Bugfixes
- The SAVE AS DEFAULT feature is now working for Channel Strip 2.
- (360 Plug-in Mixer)
- Fixed issue where alt + inserting stereo channel strips overwriting multi-mono prevented all the new channel strips from connecting.
- Re-activating a multi-mono CS2 no longer causes both legs to show in the Plug-in Mixer.
- Inserting Mono > Stereo CS2 before existing instances no longer fails.
- (Pro Tools) Alt+dragging CS2 plug-ins to a different slot no longer causes index number duplication and plug-in appears correctly in the Plug-in Mixer.
V1.0.36 (May 2021)
- Initial release.
Known Issues
- (Studio One) Studio One Undo History issues with Channel Strip 2 and 4K B. Some issues have been discovered that may cause inconsistent undo history behaviour due to the integration of Solo and Mute with Studio One.
- (360 Plug-in Mixer)
- (Pro Tools) Inserting mono -> stereo instance before a mono instance on a channel in Pro Tools assigns same track index in the Plug-in Mixer that the mono instance has.
- (LUNA) Moving plug-in to a different insert slot when that track is selected in the Plug-in Mixer/on UC1 causes Plug-in Mixer track ordering to get messed up. To fix, you must remove the offending plug-in. To avoid, make sure if you are re-ordering tracks in LUNA, the one you are dragging to a new position isn’t the selected instance in the Plug-in Mixer/on UC1.
- (LUNA) Plug-in Mixer ordering goes in reverse order when bulk inserting Channel Strip 2 (AU) plug-ins in LUNA.
Supported Platforms and Hosts
For compatibility information about plug-ins, visit the Plug-in Operating System and DAW Compatibility FAQ.
When we release an SSL plug-in, we test it on all currently supported Windows and macOS operating systems that aren't End-of-Life (EOL) at the time of release. We test the plug-ins on a range of DAWs, using the latest version publicly available version of each one. It is possible our products may work on platforms outside of this list. However, if you are using a DAW not listed in the linked article, or an older DAW version (perhaps several years old), we recommend you demo the product before purchase to confirm that it works correctly. For 360°-enabled channel strip plug-ins, refer to the UC1 User Guide for tested DAWs and their integration capabilities.
macOS M1/ARM Support
This plug-in is provided as a universal binary for macOS and features native M1 support.
Operating Systems
| macOS | Monterey (12), Big Sur (11), Catalina (10.15) |
| Windows | 11, 10 |
Hosts
- Logic Pro 10
- Pro Tools 2022
- Ableton Live 10
- Studio One 5
- Cubase 11
Demo/Trial
To demo this plug-in, you can simply download it from the product page and run it up in your host - the software will guide you through the rest of the process.
- Download and install the plug-in.
- Open your DAW/host.
- Insert the plug-in to commence activation (sometimes this will happen when the plug-in is scanned on startup, depending on your DAW/host).
- When you see 'Activation is required', click 'Try'.
- Log into your iLok account and click 'Next'.
- Select a location to activate the license to, and click 'Next'.
Installation and Download
If you own perpetual licenses for your products, we recommend using the SSL Download Manager application to to easily manage all SSL plug-in installations all from one place, on both macOS and Windows. In addition to easily installing, uninstalling or reinstalling individual or every SSL plug-in at the click of a button, the SSL Download Manager also provides you with detailed release notes and lets you know when updates are available.
You can also download offline installers for a plug-in from here.
If you are a subscriber to Complete Access, we recommend using Complete Access Hub to download, install, and activate all of the plug-ins (SSL, Harrison, and Slate Digital) that are included in the subscription.
All SSL plug-ins are supplied in VST3, AU (macOS only) and AAX (Pro Tools) formats.
The installers provided (macOS Intel .dmg and Windows .exe) copy the plug-in binaries to the common VST3, AU and AAX directories. After this, the host DAW should recognise the plug-in automatically in most cases. Simply run the installer and you should be good to go. You can find more information about how to authorise your plug-ins below.
Licensing
Visit iLok, Licensing and Activation for guidance in activating your SSL plug-in.
Overview
-
Track Name
Name of the track the Channel Strip is inserted on & the plug-in number order within the 360° Plug-in Mixer window.
-
Bypass
Toggles Plug-In Bypass In/Out
-
360°
Quick Access to open the SSL 360° Plug-in Mixer
-
Input Section
Input trim control with +/-20dB Gain & Polarity Invert Button
-
EQ
4 Band EQ with LF, LMF, HMF & HF bands with Bell options on LF & HF bands, with additional Hi Pass & Low Pass Filters
-
Dynamics
Dynamics section with Compression & Gate/Expander processing.
-
Process Order Window
Allows for re-arrangement of processors on the incoming signal or S/C signal.
-
Input/Output Meters
Large Input & Output Signal meter with summed RMS metering alongside.
-
Channel Fader Section
Expanded Output section with M/S Width Control & Pan Control (Stereo Only), as well as VCA Modelled Fader Output, Solo, Cut, Solo Clear/Safe, S/C & digital Output Trim
-
Plug-In Version Number
Shows the current version number of the installed Plug-in
-
HQ
Enables/Disables ‘High Quality’ Mode, enabling 2x Oversampling.
-
Contextual Help
Selecting the ? button opens a text window tooltip that will open when the cursor hovers over a controllable parameter. The text box will give a brief explanation of the parameter function.
-
Plugin Preset Selection
clicking on the preset name will expand a window to enable the selection of SSL presets & user saved presets. clicking this will also allow the current plug-in settings to be saved as a preset for future use.
-
A/B
Enables the option to alternate between two different settings for comparison without using the preset menu.
-
Undo / Redo
Enables the option to undo a parameter change, or redo an undone change.
360° Plug-in Mixer + UC1/UF8
The SSL Channel Strip 2 is a 360-enabled plug-in, and integrates with the SSL 360° Plug-in Mixer.
Since Channel Strip 2 is controllable from the 360° Plug-in Mixer, it has first-class integration with the powerful UC1 & UF8 hardware control surfaces. For more information on the UC1 integration & SSL 360° please refer to the UC1 User Guide.
|
|
SSL UC1SSL hardware for your SSL software For in-depth information about how to use the SSL UC1 hardware plug-in controller with your 360-enabled plug-ins, please visit the SSL UC1 user guide here.
To find out more about the UC1, visit the product page on our website: UC1 | Solid State Logic |
|
|
SSL UF8Accelerated creativity, intelligent production For in-depth information about how to use the SSL UF8 studio and DAW controller with your 360-enabled plug-ins, please visit the SSL UC1 user guide here.
To find out more about the UF8, visit the product page on our website: UF8 | Solid State Logic |
To find out more about the SSL 360° Plug-in Mixer and integrated hardware, please visit the product page on our website: SSL 360 | Solid State Logic
Upgrading from Channel Strip 2 (v1) to Channel Strip 2 (v2)
|
|
|
|
Channel Strip 2 (Legacy v1) |
Channel Strip 2 (v2) |
For maximum backwards compatibility with your mixes, Channel Strip 2 (v2) replaces Channel Strip 2 (Legacy v1). This allows you to take advantage of major feature updates to the Channel Strip 2 and 360° Plug-in Mixer.
Your existing settings are maintained, but there are some changes to be aware of:
New Fader Level parameter vs Output Trim
Previous iterations of Channel Strip 2 did not have an output fader, only an Output Trim control. In Channel Strip 2 (v2), we have introduced a dedicated Fader Level parameter with the SSL fader scale so that the plug-in can be mixed 'n' matched with the brand new 4K B channel strip plug-in inside of the 360° Plug-in Mixer, for a 'virtual SSL console' workflow.
Your existing Output Trim parameter values are maintained, but will not be translated to the new Fader Level parameter since its range is (-∞ to +12 dB) compared to (±20 dB) range on the Output Trim.
The Output Trim and Fader Level can be used together, but in some channel strip plug-ins (the 4K B) the Fader Level introduces gentle modelled saturation whereas the Output Trim is a digital, clean gain.
Filter & EQ Section
Channel Strip 2 features the classic 4-band SSL EQ layout, digitally modelled on the curves of the XL 9000K EQ circuit & includes a 12 dB per octave low pass (LP) filter and 18 dB per octave high pass (HP) filter able to be positioned Pre or Post EQ.
|
1. LOW-PASS FILTER 12 dB per octave low-pass filter 2. HIGH-PASS FILTER 18 dB per octave high-pass filter 3. HF SHELF +/- 20dB HF Band between 1.5 kHz & 22kHz with optional Bell Curve 4. HMF Band +/- 20dB HMF Band between 600Hz & 7kHz with Q Width 2.5 to 0.5 5. LMF Band +/- 20dB LMF Band between 200Hz & 2kHz with Q Width 2.5 to 0.5 6. LF SHELF +/- 20dB LF Band between 40Hz & 600Hz with optional Bell Curve 7. E Button The CS 2 EQ Curves can be switched between G-Series and E-Series curves using the E button. When in G-Series mode (default), the shelving curves have a degree of overshoot/undershoot (depending on whether you are boosting or cutting) below the selected HF frequency or above the selected LF frequency. Selecting the E button removes the overshoot/undershoot effect and provides a slightly gentler slope to the shelving curves. This can be seen in Fig 1. below. 8. POWER The EQ can be switched in/out using the EQ button. |
Fig 1.
In G-Series mode, at any Q setting, the bandwidth of the HMF and LMF sections varies with gain, whereby boosting or cutting gradually increases the selectivity of the EQ. This type of EQ can sound effective when used at moderate settings; the gentle Q curve lends itself to the application of overall EQ on combined sources and subtle corrective adjustments to instruments and vocals.
When the EQ is switched to E operation, the bandwidth of the HMF and LMF sections remains largely constant at all gains, so at lower gains, the EQ curves are comparatively narrower for a given Q setting. This is particularly useful for drums since relatively high Q is available at low gain settings. However, it is not as suitable for overall EQ or subtle corrections, as you need to adjust the Q to maintain the same effect when the gain is changed. Having said that, you should always let your ears guide your decisions.
Anti-Cramping Algorithms
Channel Strip 2 V2 includes SSL's proprietary 'anti-cramping' algorithms, which prevent the unpleasant artefacts that can occur as a result of EQ cramping. EQ cramping can cause asymmetrical response curves (in amplitude and phase) when using Bell curves in the 15 kHz to 20 kHz region. Most plug-ins have to deploy oversampling to deal with this but our solution 'bakes in' the anti-cramping DSP, without the additional delay compensation expense introduced by oversampling.
Dynamics Section
The Dynamics section includes a Compressor/Limiter and an Expander/Gate. Both sections work independently but can be operational at the same time, providing sophisticated control of signal levels. The Dynamics section can be switched in/out using the DYNAMICS button.
Compressor
|
1. Compressor Mix Determines the parallel mix amount of wet signal added to the Dry pre-compressed signal. 100% means the signal is entirely the signal passed through the compressor section, and 0% is an entirely dry signal path following the previous channel strip processing sections. 50% would be equal amounts wet to dry signal. 2. RATIO The severity with which the signal is reduced when it exceeds the THRESHOLD. 3. THRESHOLD Sets the point at which gain reduction is applied to the signal. In this compressor design, the Threshold also applies an automatic gain-make-up. 4. RELEASE Controls how quickly the level returns to normal after the input level has dropped below the Threshold (measured in seconds). 5.FAST ATTACK The attack time is adjusted automatically to match the audio. To choose a constantly fast attack time, press the FAST ATTACK switch. 6. PEAK This button switches from RMS to peak signal detection. In RMS mode (default) the compressor reacts to the average signal level and has a soft knee characteristic. When switched to peak mode, it responds to peak signal level and introduces a hard knee characteristic, resulting in more dramatic compression. |
7. Metering Compression Metering is shown on the left-hand array of five LEDs (yellow and red) 8. Power The On/Off switch for the Dynamics Section enables and bypasses the Dynamics from the circuit.
|
Gate/Expander
|
1. RANGE Determines the severity to which the signal is reduced when it falls below the THRESHOLD. 2.THRESHOLD The control uses different levels to ‘open’ the gate to audio and to ‘close’ it again – the level at which the gate opens is higher than the level at which it closes again. In other words, when the gate is opened, it stays open until the signal level crosses the quieter ‘close’ threshold. This is known as hysteresis and is very useful as it allows instruments to decay more naturally. The word ‘Threshold’ normally refers to the ‘open’ threshold. 3. HOLD This controls the delay before the output signal level starts reducing again. 4. RELEASE This controls how quickly the level then reduces. Note that the RELEASE interacts with the RANGE, which determines the depth of gain reduction. 5.FAST ATTACK The attack time (the time taken for the Expander/Gate to ‘recover’ once the signal level is above the ‘deactivate’ threshold) is normally set to 1.5ms per 40dB. Press the FAST ATTACK switch to introduce a faster attack time of 100μs per 40dB. This is useful when gating signals with a steep rising edge, such as drums. |
6. EXPAND This button puts the gate into a downwards expansion mode, providing a gentler 2:1 ratio, instead of the nominal 40:1 ratio gate. 7. Metering Gate/Expander metering is shown on the right-hand array of five green LEDs. 8. Power The On/Off switch for the Dynamics Section enables and bypasses the Dynamics from the circuit. |
Output Section
The Output Section adds an additional FADER LEVEL parameter.
This fader controls the output signal of the plug-in and can be gained up to +12 dB and allows fader control within the SSL 360° Plug-in Mixer. The output trim is also available to compensate for additional gain added at this stage.
The WIDTH & PAN controls for (only for plug-in instances with a stereo output) allows for additional mid-side (M/S) width control & panning of the signal. These two options are greyed out when the plug-in is instanced on a mono channel.
|
1) Width* Default state (1) means is standard stereo operation, and no mid/side processing is applied to the signal. 2) Pan* Default state is ‘C’ which means no panning is applied to the signal. *The controls are available in stereo or mono-to-stereo operation only. When the plug-in output is mono, WIDTH & PAN controls will be greyed out. 3) Solo** Engages channel solo. 4) CUT** Engages channel cut (mute). **When using the VST3 format in Live, Studio One or REAPER, the SOLO & CUT are automatically linked to the DAW’s solo and cut controls. 5) Fader Control This can be used to control the output level when working within the SSL 360° Plug-In Mixer. This Fader level be offset with the output trim to compensate for level. 6) Solo Modifiers SOLO SAFE* protects a channel from being muted when another channel is solo'd. This is useful when using the channel strip plug-in on an aux or bus.
|
SOLO CLEAR turns off solo for all channels. *SOLO SAFE only works when the channel strip is connected to the 360° Plug-in Mixer, and using the 360° Plug-in Mixer solo layer. If using the VST3 format in a compatible DAW (Live, Studio One, REAPER) then SOLO SAFE will not function. SOLO CLEAR will still function. 7) Sidechain Listen Solos the sidechained signal. 8) Output Trim The digital output allows an extra clean gain stage, post VCA fader. Use this control to compensate for added gain when driving the VCA harmonics with a range of ±20 dB, or to trim the level without destructively effecting your current fader level.
|
Routing Menu and Sidechaining
The Routing Menu allows you to configure the processing order of the Filters, EQ and Dynamics processing blocks. Click on the up/down arrows to position that processing element within the overall signal flow.
Please note: EQ > DYNAMICS > FILTER is not possible. In SSL's analogue consoles, the filter will always occur directly before the EQ unless 'Filter to Input' is activated.
|
1) Filters to Sidechain Use the 'FILTERS' radio button to move the filters from the input signal path to the sidechain path. 2) EQ to Sidechain Use 'EQ' radio button to move the EQ to the dynamics sidechain. 3) Routing Order Press the up/down arrows in DYN, EQ & FILTERS to reorder the modules. 4) External Side Chain Use the 'EXT' checkbox to feed the compressor sidechain from an external source, routed from your DAW. Check your DAWs documentation on how to route a signal to a plug-ins sidechain input. 5) S/C Listen Indicator The S/C Listen Indicator will light up when S/C Listen is enabled. |
How the Solo System Works
1) Live (VST3), Studio One (VST3) and REAPER (VST3)
When using the VST3 format in Live, Studio One or REAPER, the SOLO & CUT are automatically linked to the DAW’s solo and cut controls.
2) DAWs without VST3 extension support
In other all other DAWs except those listed above, the mixer-wide solo'ing functionality will require the SSL 360° application to be running on your desktop.
The solo feature works by cutting the output of all other 360-enabled channel strip plug-ins in the DAW session. This happens when you action a Solo (either from the UC1, the 360-enabled plug-in, or from the 360° Plug-in Mixer). Therefore, it is recommended that you:
- Insert a 360-enabled channel strip plug-in on all tracks in your DAW session.
- Make sure to engage the SOLO SAFE button on channel strip plug-ins that have been inserted onto auxes/busses/sub-groups/sub-mixes. This will ensure that you hear individual instruments that are routed to these destinations when you start soloing.
SOLO SAFE prevents a channel strip from being cut when another channel strip's SOLO is activated.
Sidechaining
The 'EXT' (External) toggle in the Routing Menu feeds the Dynamics module fed from an external sidechain, routed from your DAW. Check your DAWs documentation on how to route a signal to a plug-ins sidechain input.
e.g. you could route a kick drum signal to the sidechain input of a plug-in instance on your bass guitar track, and toggle 'EXT' in. This would trigger the compressor the a bass guitar from the kick signal, causing the bass guitar to be 'ducked' when the kick occurs.
The high- and low-pass filters and EQ modules can be moved into the Dynamics sidechain, using the circular toggles in the Routing Menu. The 'EQ' toggle corresponds to 'EQ to Sidechain' and the 'FILTERS' toggle corresponds to 'Filters to Sidechain'.
Version Number
In the bottom-right of the plug-in, the version number is shown (e.g.1.1.7). This is important to pay attention to because SSL 360° releases will sometimes require a certain version of plug-in to be installed in order for the system to function correctly. Please check the SSL 360° Release Notes article on the SSL knowledge base to check you are running compatible versions.
Presets
All of our plug-ins ship with carefully designed presets to aid your workflow.
Factory presets are included in the plug-in installation, installed in the following locations:
macOS: /Library/Application Support/Solid State Logic/PlugIns/Presets/ChannelStrip2
Windows: C:\ProgramData\Solid State Logic\PlugIns\Presets\ChannelStrip2
Switching between presets can be achieved by clicking the left/right arrows in the preset management section of the plug-in GUI, and by clicking on the preset name which will open the preset management display.
The Preset Management menu reflects the folder structure of the preset folder.
Revert Changes and Delete
- Revert Changes discards any changes to the current preset.
- Delete removes the current preset from the filesystem. Factory and Producer presets cannot be deleted from the plug-in GUI, although they can be manually deleted using the filesystem (Windows Explorer or Finder).
A/B and Copy
- A/B allows you to toggle quickly between two presets. This is useful for comparing between two parameter settings.
- COPY X TO Y is used to copy presets between A/B.
UNDO/REDO
SSL plug-ins come with a built-in UNDO/REDO stack, in case your DAW doesn't handle this.
- UNDO undoes the current action in the history stack.
- REDO re-does the next action in the history stack.
HQ mode
Click the HQ button introduces processing such as oversampling under-the-hood - allowing you to sacrifice CPU for higher quality audio. In particular, oversampling produces less aliasing wherever the signal is distorted (the Dynamics section) and further alleviates the effects of cramping (in addition to SSL's 'anti-cramping' algorithms - the difference being that the 'anti-cramping' algorithm reduces cramping with no additional latency).
Built-in Help
This plug-in features built-in contextual help. To turn this feature on, click the '?' in the bottom right-hand corner. Mouse over elements of the GUI to see some information about the feature.
Click the tooltip to cycle through the pages.