
Introduction
The SSL 4K G channel strip plug-in brings the iconic SL 4000 G to your digital audio workstation, with an exacting emulation of the console that defined sounds of a generation.
Building on the success of the 4000 E, the 4000 G debuted at the 1987 AES Convention in New York and soon earned its reputation as the ultimate mixing console. With a redesigned Pink Knob ‘292’ EQ, multiple circuit refinements and a powerful yet intuitive automation system, the G-Series console had an unmatched sound, coupled with a superior creative workflow.
From Olympic Studios in London to the Record Plant in LA, 4000 G consoles soon became a staple in leading studios worldwide. Its unmatched sonic stature and incredible versatility transcended genres, shaping countless chart-topping hits across pop, rock, and hip-hop. Renowned engineers like Andy Wallace, Spike Stent and MixedByAli have all crafted timeless records on the 4000 G console.
This plug-in is a 360-enabled plug-in and integrates with the SSL 360° Plug-in Mixer software, including first-class integration and hands-on control via the SSL UC1, SSL UF8 and SSL UF1 hardware controllers.
Key Features
The 4K G plug-in is the definitive emulation of the SSL 4000 G console channel strip:
- Authentic model of the 4000 G; the console that defined the sounds of a generation.
- Celebrated by top mixing engineers like Andy Wallace, Spike Stent and MixedByAli.
- First class integration with UC1/UF8/UC1 via SSL 360° and the Plug-in Mixer
- Detailed circuit modelling, down to component level
- Choose between 4000 G-Series Pink 292 and Black 242 EQ flavours
- 4000 G-Series Dynamics modelling
- 4000 E-Series Mic Amp Jensen JT-115K-E mic pre with adjustable saturation
- Variable Mic Input Impedance Control from the classic FX383 G-Series outboard unit
- Output Fader VCA modelling
- ‘HQ’ mode for intelligent oversampling
- Compressor Mix control
- Advanced settings – Compressor make-up gain configuration and VCA modelling on/off
- Enhanced output section with virtual fader and stereo image control, including Fader Level, Pan, and Width parameters.
- Enhanced UC1/UF8/SSL 360° Plug-in Mixer integration.
- Scalable GUI
- Pro Tools EQ and Dynamics integration
- Built-in help
- Cross-platform preset management
- Undo/Redo
A note on analogue modelling and measurements
This plug-in has been developed using the original circuit schematics, analogue simulations, component-level modelling and detailed hardware prototypes.
When testing a plug-in, please note that the classical "transfer function" method is only defined for linear, time-invariant systems - and therefore the testing approach should be considered carefully. Some of the typical testing methodologies that you leverage in audio measurement software such as Plugindoctor, SATlive or Smaart can lead to erroneous results - so make sure you understand the caveats of the testing approach and whether or not it is valid for a non-linear system.
Please take care especially when using the Linear Analysis tab on Plugindoctor, as the plug-in features non-linearities (additional frequencies or distortion added), and the results are likely to be incorrect and not representative.
You can observe how the method of test can change the result, by comparing the results you get with different testing approaches, and understanding the caveats of each one. Of course, if changing the testing approach changes the conclusion, then the test is unreliable!
Release Notes
For more comprehensive release notes and known issues about integration with the SSL 360° Plug-in Mixer and other hardware controllers, please refer to: SSL 360° Downloads and Release Notes
V1.0.11
- Initial Release
Supported Platforms and Hosts
For compatibility information about plug-ins, visit the Plug-in Operating System and DAW Compatibility FAQ.
When we release an SSL plug-in, we test it on all currently supported Windows and macOS operating systems that aren't End-of-Life (EOL) at the time of release. We test the plug-ins on a range of DAWs, using the latest version publicly available version of each one. It is possible our products may work on platforms outside of this list. However, if you are using a DAW not listed in the linked article, or an older DAW version (perhaps several years old), we recommend you demo the product before purchase to confirm that it works correctly. For 360°-enabled channel strip plug-ins, refer to the UC1 User Guide for tested DAWs and their integration capabilities.
Demo/Trial
To demo this plug-in, you can simply download it from the product page and run it up in your host - the software will guide you through the rest of the process.
- Download and install the plug-in.
- Open your DAW/host.
- Insert the plug-in to commence activation (sometimes this will happen when the plug-in is scanned on startup, depending on your DAW/host).
- When you see 'Activation is required', click 'Try'.
- Log into your iLok account and click 'Next'.
- Select a location to activate the license to, and click 'Next'.
Installation and Download
If you own perpetual licenses for your products, we recommend using the SSL Download Manager application to to easily manage all SSL plug-in installations all from one place, on both macOS and Windows. In addition to easily installing, uninstalling or reinstalling individual or every SSL plug-in at the click of a button, the SSL Download Manager also provides you with detailed release notes and lets you know when updates are available.
You can also download offline installers for a plug-in from here.
If you are a subscriber to Complete Access, we recommend using Complete Access Hub to download, install, and activate all of the plug-ins (SSL, Harrison, and Slate Digital) that are included in the subscription.
All SSL plug-ins are supplied in VST3, AU (macOS only) and AAX (Pro Tools) formats.
The installers provided (macOS Intel .dmg and Windows .exe) copy the plug-in binaries to the common VST3, AU and AAX directories. After this, the host DAW should recognise the plug-in automatically in most cases. Simply run the installer and you should be good to go. You can find more information about how to authorise your plug-ins below.
Licensing
Visit iLok, Licensing and Activation for guidance in activating your SSL plug-in.
Overview
-
Track Name
The name of the track is automatically provided from your DAW, if supported (VST3/AAX/AU only).
-
Bypass
Toggles plug-in processing in or out.
-
360°
Opens the SSL 360° Plug-in Mixer window.
-
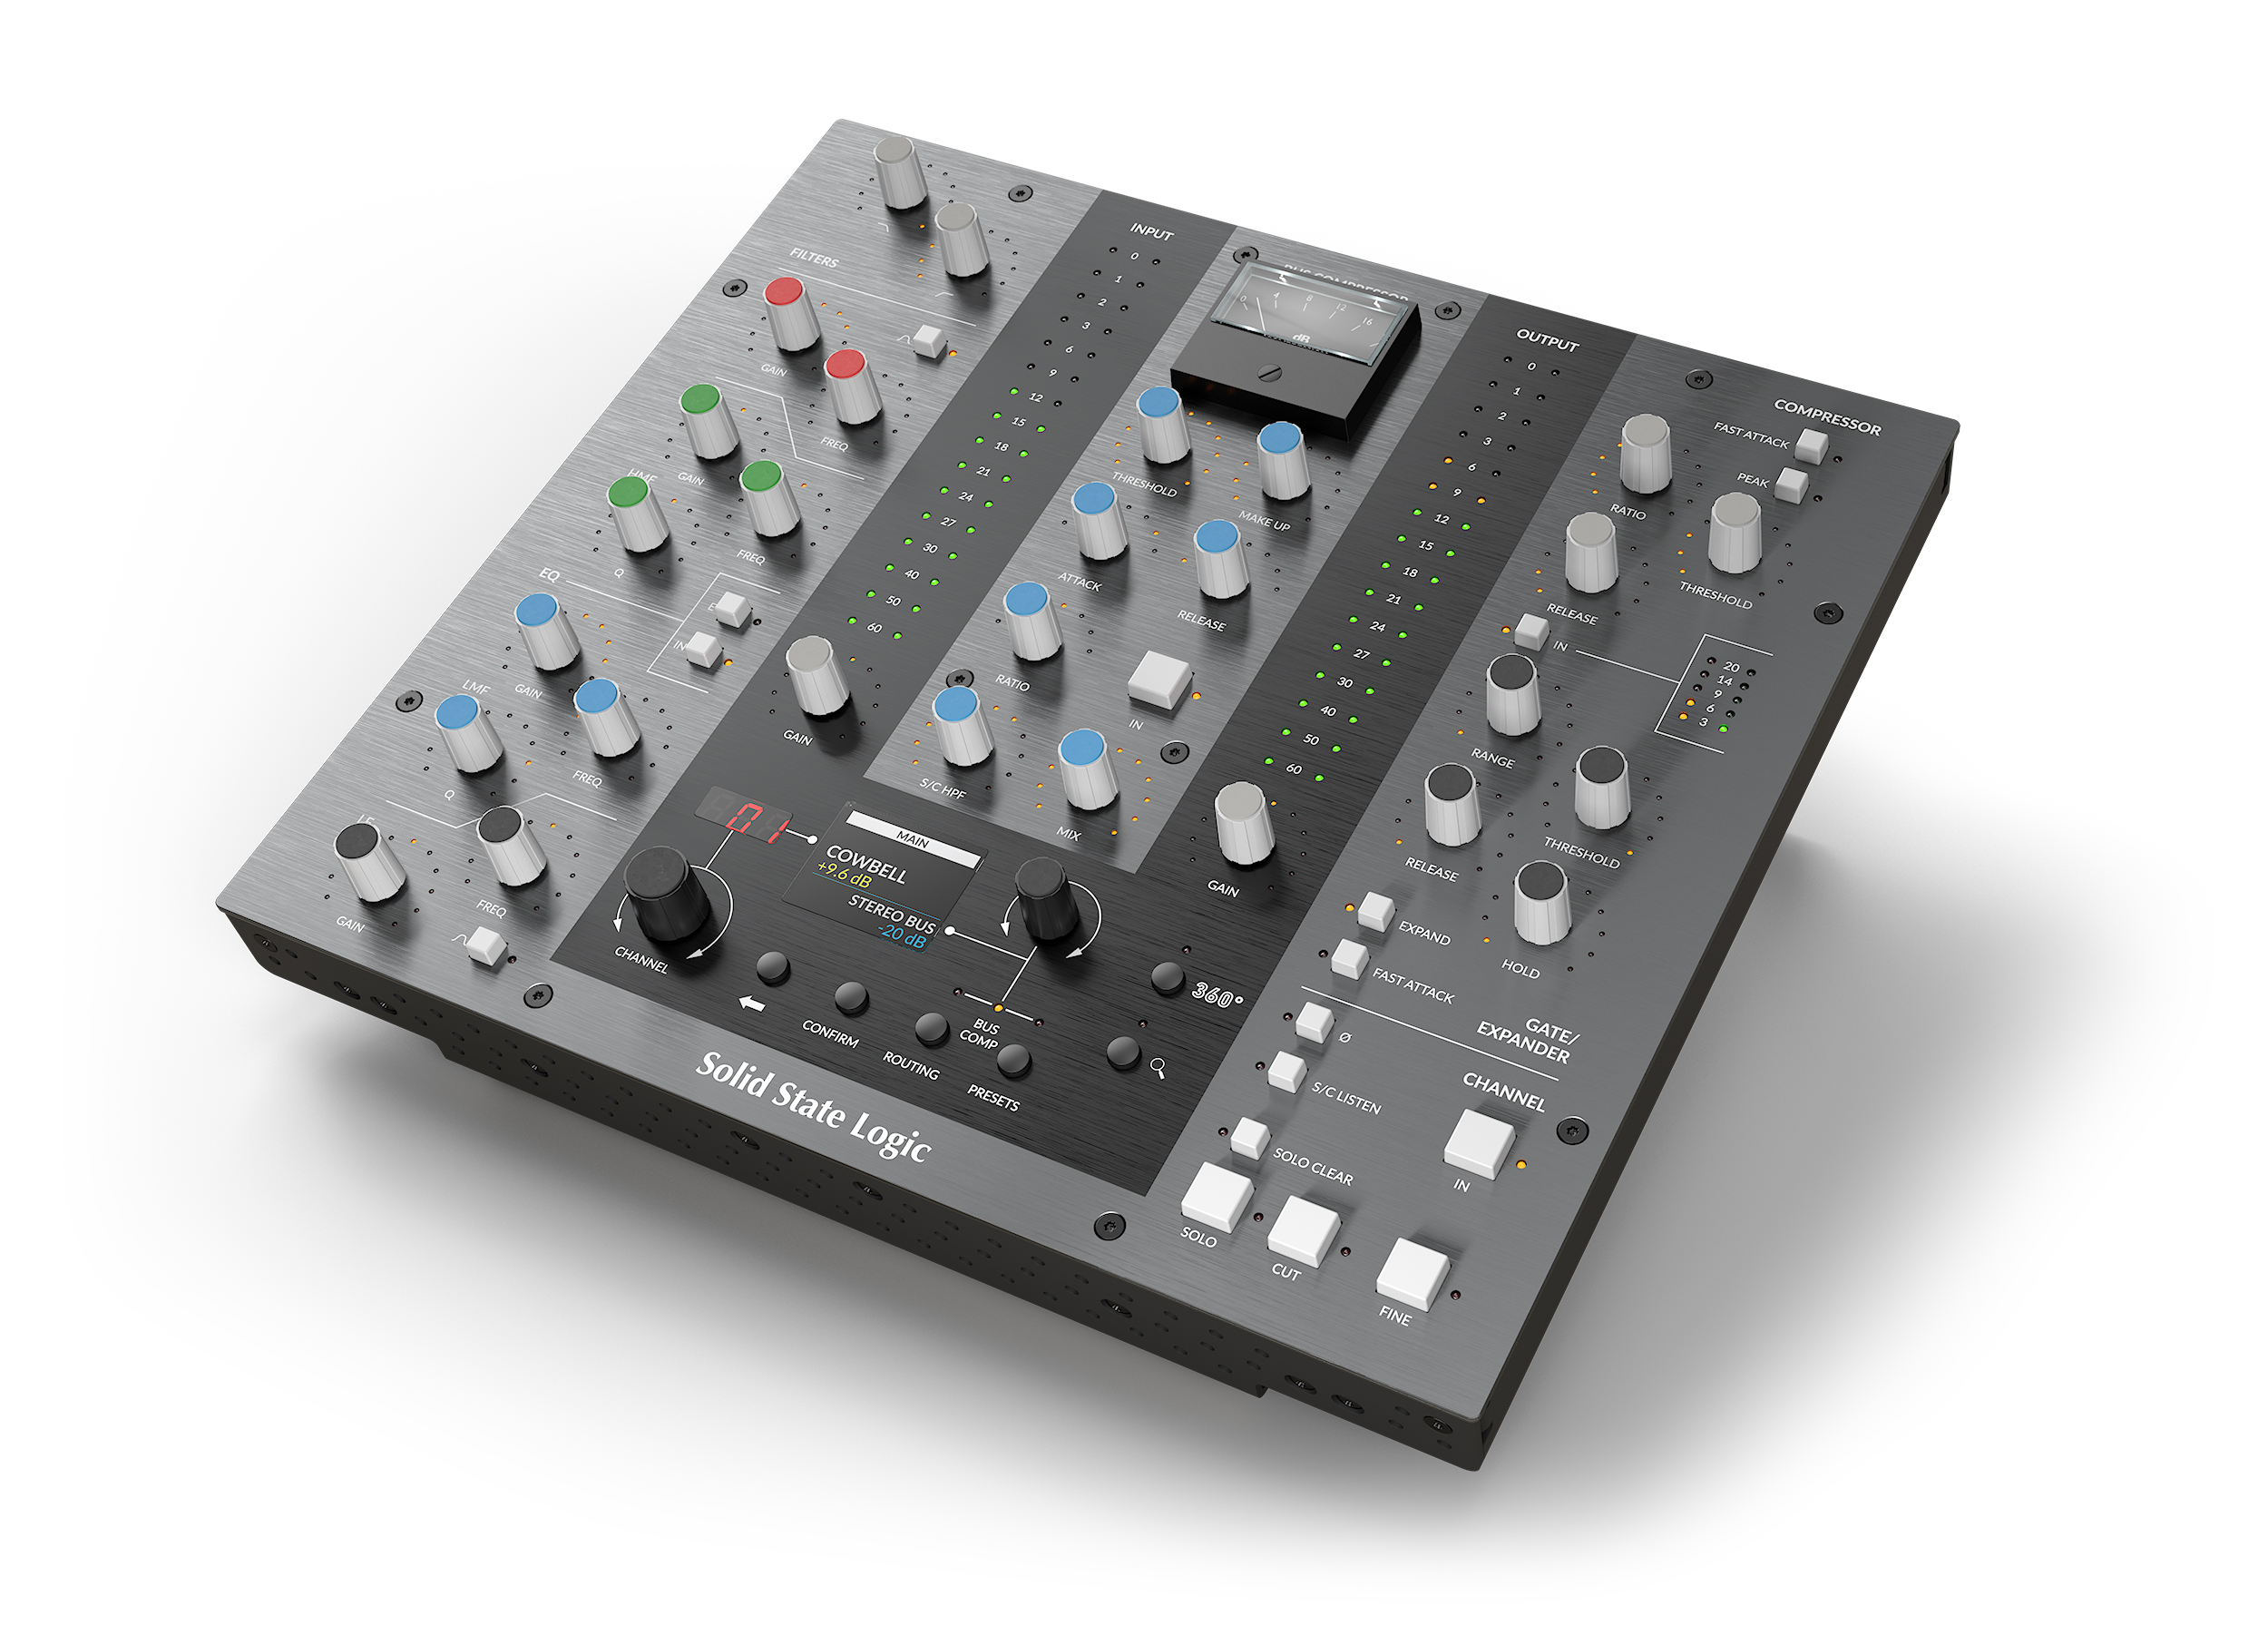
Input Section
Mic Amp stage with gain-compensated saturation and variable impedance control for bountiful tonal shaping options. Additionally, an Input Trim and Polarity (ϕ) Invert is provided.
-
EQ
4-band EQ with LF, LMF, HMF & HF bands and additional high- and low-pass filters. Choose between 292 Pink Knob and 242 Black Knob EQ modes.
-
Dynamics
4000 G Dynamics section with compression & gate/expander processing.
-
Routing Menu
Allows you to rearrange the order of processing (dynamics, EQ) or move them to the sidechain.
-
Output Section
Output section with mid-side (M/S) width control & pan (stereo and mono-to-stereo instances only), as well as modelled VCA fader, solo, cut, solo clear and safe options, sidechain listen and a clean output trim.
-
Input/Output Meters
Instantaneous input & output signal meters and RMS average metering.
-
SSL Plug-in Engine
Additional functions including: Undo/Redo, A/B, Preset Management High Quality Mode (HQ), Advanced Settings, Plug-in Scaling and Built-in Help.
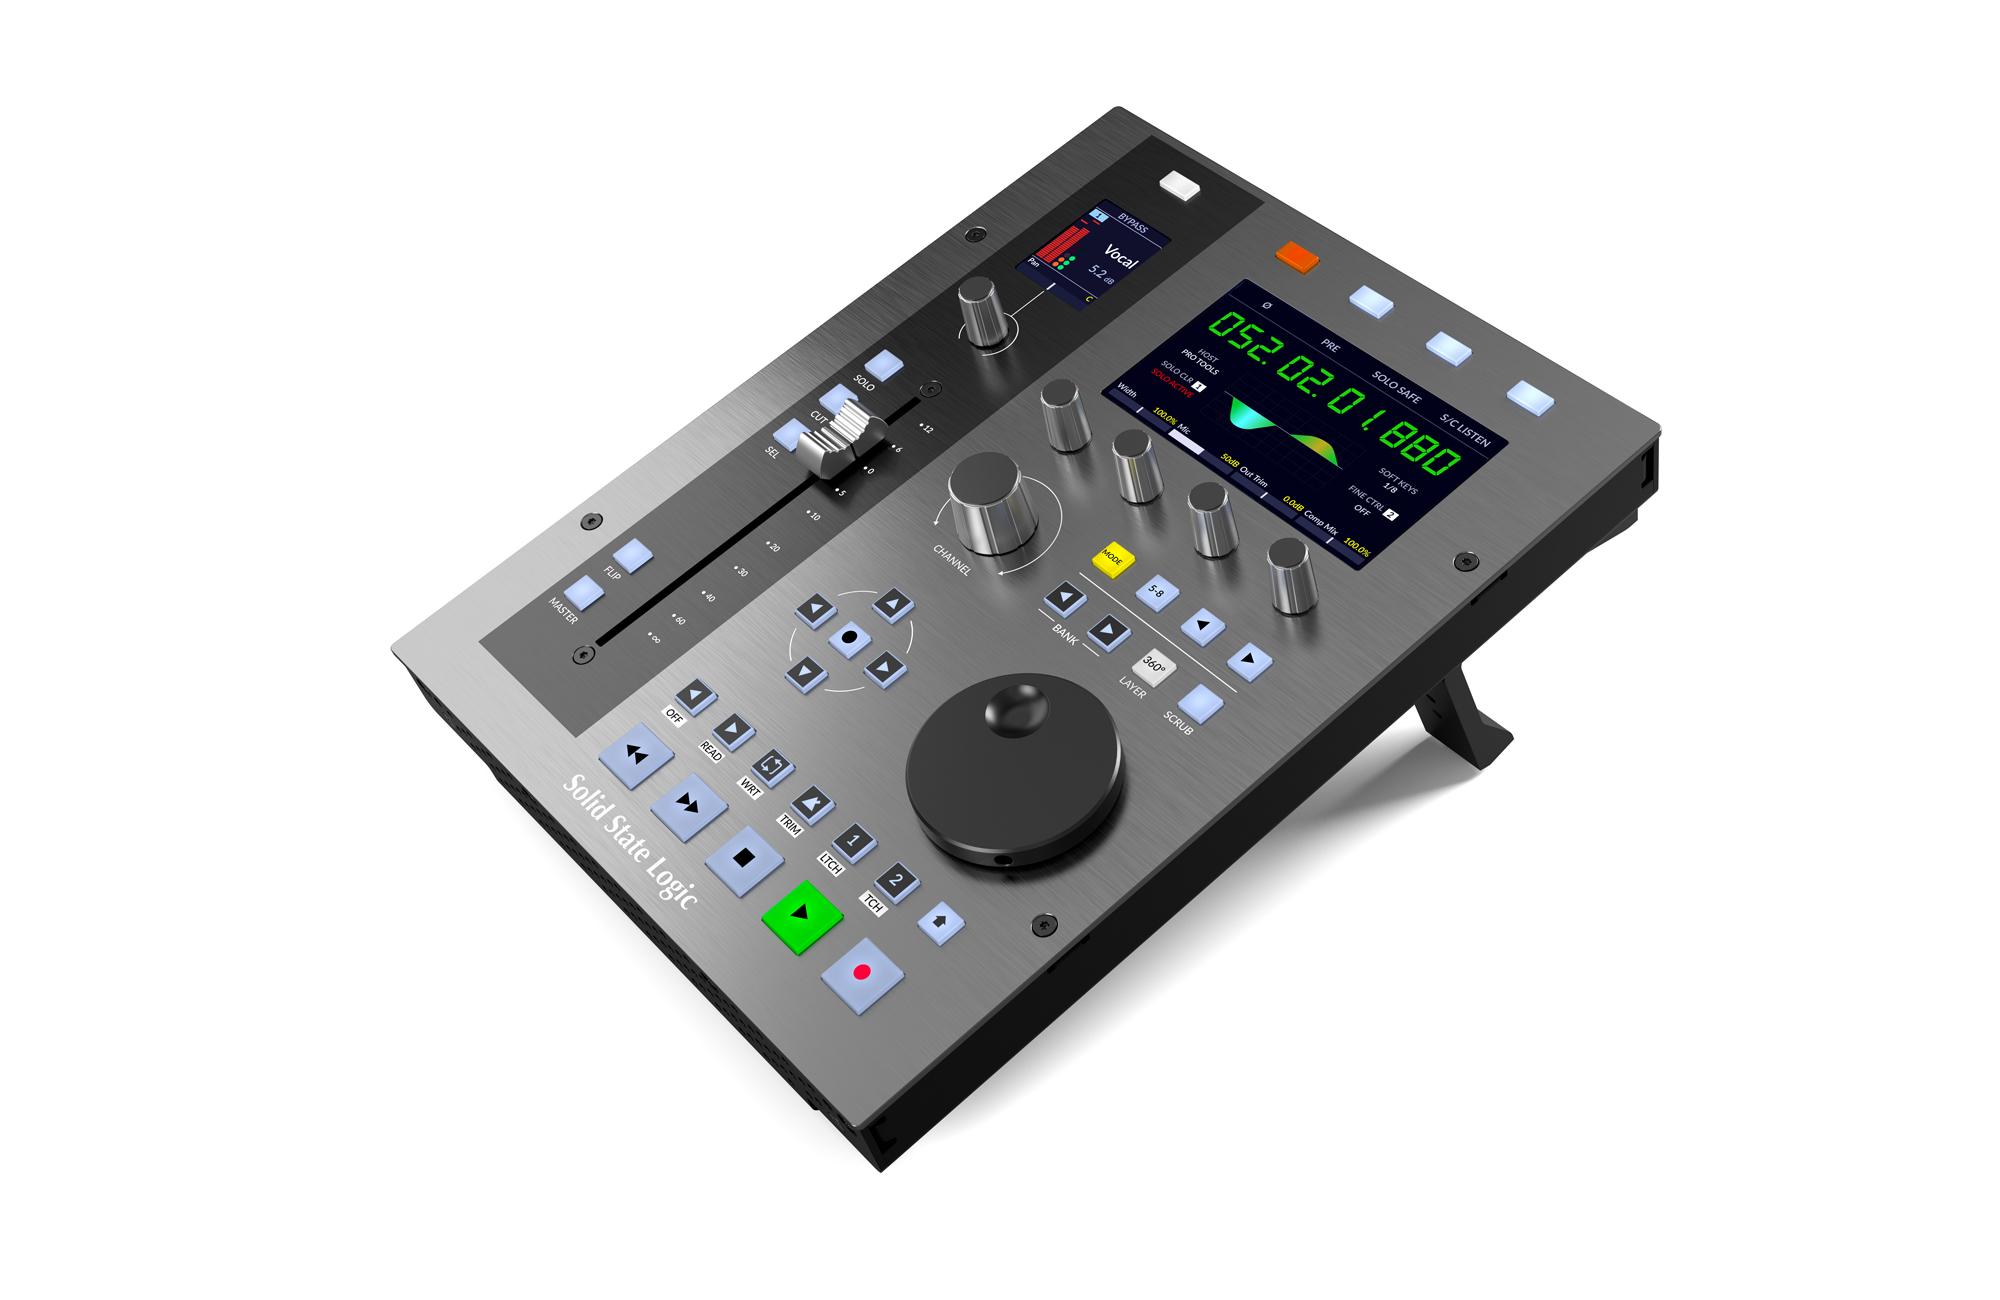
360° Plug-in Mixer + UC1/UF8/UF1
This plug-in is a 360-enabled plug-in, and integrates with the SSL 360° Plug-in Mixer.
Since the plug-in is controllable from the 360° Plug-in Mixer, it has first-class integration with the powerful UC1 & UF8 hardware control surfaces. For more information on the UC1 integration & SSL 360° please refer to the user guides on the UF1, UC1 and UF8 product pages.
Please refer to SSL 360° Downloads and Release Notes for more information about the latest release.
SSL UC1
SSL hardware for your SSL software
For in-depth information about how to use the SSL UC1 hardware plug-in controller with your 360-enabled plug-ins, please visit the SSL UC1 user guide.
To find out more about the UC1, visit the product page on our website: UC1 | Solid State Logic
SSL UF8
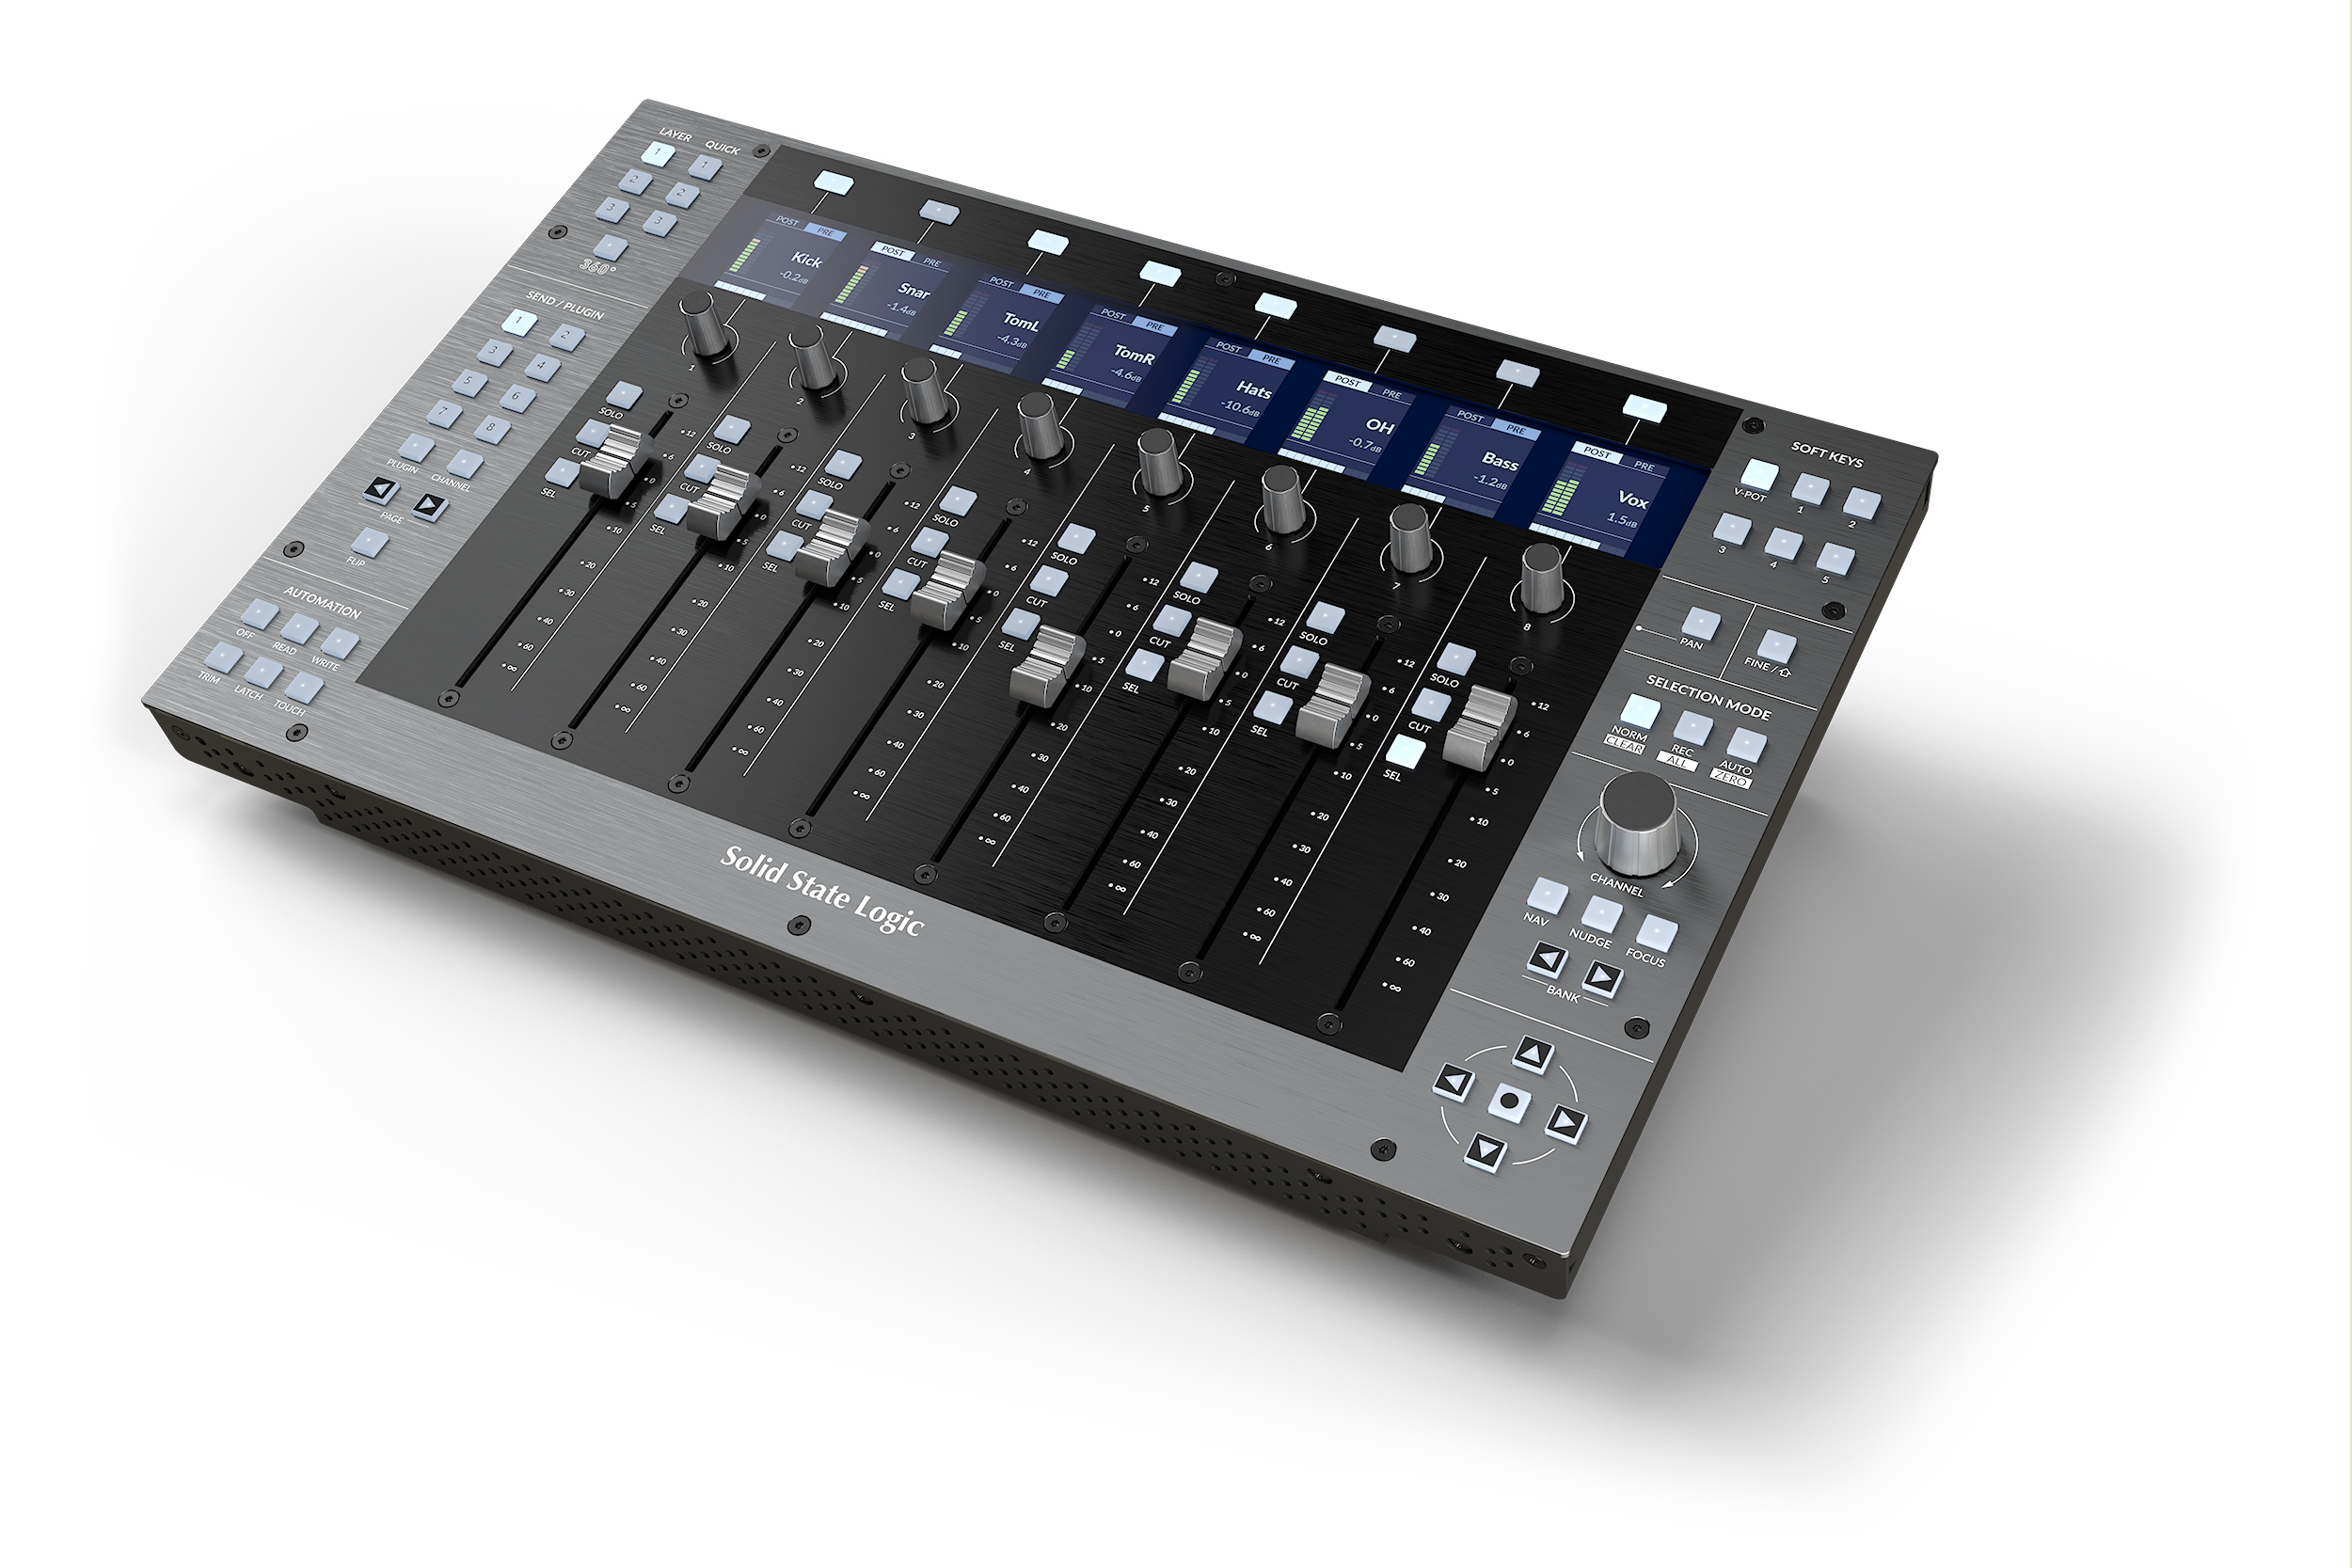
Accelerated creativity, intelligent production
For in-depth information about how to use the SSL UF8 studio and DAW controller with your 360-enabled plug-ins, please visit the SSL UF8 user guide.
To find out more about the UF8, visit the product page on our website: UF8 | Solid State Logic
SSL UF1
Solid State Logic's legacy in control
For in-depth information about how to use the SSL UF1 single fader DAW controller with your 360-enabled plug-ins, please visit the SSL UF1 user guide.
To find out more about the UF8, visit the product page on our website: UF1 | Solid State Logic
To find out more about the SSL 360° Plug-in Mixer and integrated hardware, please visit the product page on our website: SSL 360 | Solid State Logic.
Input Section
The Input Section provides two signal paths; a clean one, and an analogue one.
The INPUT TRIM control is the equivalent of a 'line input trim' on a console, and provides a clean signal path with ±20 dB of gain.
When PRE is switched in, the signal is passed through hardware-modelled JE-115K-E Transformer mic pre-amp before the INPUT TRIM. This allows for everything from gentle saturation to rich distortion.
MIC allows you to add up to +50 dB of automatically-compensated gain through the transformer gain stage. This allows you to drive the input signal and add harmonics without destructively affecting your level.
In addition, when the Ω button is switched in you can adjust the impedance of the mic pre amp using the IMP control. This effect mimics the variable impedance control found on the FX383 G-Series outboard hardware channel strip but with an extended range down to 1 ohm - perfect for lo-fi drum crunching, for example. Note - the PRE and Ω must be engaged for the IMP control to have effect.
- PRE off = input signal → INPUT TRIM → POLARITY (ϕ) → rest of plug-in
- PRE on = input signal → Variable Impedance control (if engaged) → MIC pre-amp → INPUT TRIM → POLARITY (ϕ) → rest of plug-in
|
Input Trim Trim the input signal ±20 dB. Polarity (ϕ) Inverts the phase of the input signal. Mic Gain Adds 0-50 dB of gain via the mic-pre amp emulation. This drive stage is automatically gain-compensated, so it only introduces harmonics without destructively affecting the level of your signal. You’ll need to engage the PRE button first. The accompanying LED lets you know how hard you’re driving the circuit.
PRE Toggles the MIC pre-amp gain stage in or out. IMP Variable Impedance control allows you to adjust the impedance of the mic pre between 6.2 kΩ and 1Ω. Lower impedance values create a more obvious tonal effect. Note - the PRE and Ω buttons must be engaged for the IMP control to have effect. Ω Toggles the Variable Impedance (IMP) control in or out. |
Equaliser Section
The 4K G EQ can be switched between the 292 Pink Knob and the 242 Black Knob EQ circuits. The 292 employs a variable Q design, meaning that smaller boosts or cuts naturally result in broader curves, in contrast to the more 'surgical' constant Q design of the 242.
The 292 also features the distinctive HMF ×3 and LMF ÷3 selector switches, true to the original 292 design. These switches allow the HMF and LMF bands to be shifted to the outer extremes of the frequency spectrum. This flexibility lets you sculpt bell curves with either wide or narrow Q settings in the low and high frequency regions, in addition to the standard LF and HF shelf controls.
Further adding to its appeal, the HF and LF shelves of the 292 offer a steeper response to that of the 242, along with a distinctive ‘undershoot/overshoot’ behaviour at the corner frequency which many engineers describe as extremely 'musical'.
|
Filters IN Toggles the filters processing in or out. Low-Pass Filter Engaged when moved from the out position, with a cutoff down to 3 kHz. High-Pass Filter Engaged when moved from the out position, with a cutoff up to 350 Hz. HF Band High frequency shelf with up to ±20 dB gain between 1.5 kHz to 16 kHz HMF Band High-mid frequency bell filter with variable Q width and up to ±22 dB Gain control from 600 Hz to 7 kHz. EQ IN Toggles the EQ processing in or out. BLK Switch from the 292 Pink Knob EQ to the 242 Black Knob EQ. LMF Band Low-mid frequency bell filter with variable Q width and up to ±22 dB gain control from 200 Hz & 2.5 kHz. LF Band Low frequency shelf with up to ±18 dB gain from 30 Hz to 450 Hz. |
Dynamics Section
By the time the 4000 G console was released in 1987, the SSL channel dynamics had undergone many incremental circuit revisions over the 4000-series era. From the aggressive compression of the 4000 B to the much loved ‘pop’ of the 4000E, the 4000 G provided a more refined tightness to its compression characteristic, which proved invaluable in the creation of evermore elaborate and dense mixes. That same precision makes the 4K G dynamics just as impactful, especially when used across multiple tracks in today's complex productions.
|
Compressor Mix Determines the parallel mix amount of wet signal added to the Dry pre-compressed signal. 100% means the signal is entirely the signal passed through the compressor section, and 0% is an entirely dry signal path following the previous channel strip processing sections. 50% would be equal amounts wet to dry signal. Compression Ratio The severity with which the signal is reduced when it exceeds the Threshold. When set to 1, the compressor is bypassed. Compressor Fast Attack Provides a fast attack time (3 ms per 20 dB gain reduction). Compressor Threshold Set the threshold from +10 to -20 dB. The threshold determines the level above which compression occurs. In this compressor design, the Threshold also applies an automatic gain-make-up. This can be disabled via Advanced Settings. Compressor Release Controls how quickly the level returns to normal after the input level has dropped below the Threshold (measured in seconds). DYN IN Toggles the dynamics processing (both compression and gate/expander) in or out. Gate/Expander Threshold Sets the threshold above which the the gate/expander will be opened. Variable hysteresis is incorporated in the threshold circuitry. For any given ‘open’ setting, the Expander/Gate will have a lower ‘close’ threshold. The hysteresis value is increased as the threshold is lowered. This is very useful in music recording as it allows instruments to decay below the open threshold before gating or expansion takes place. Gate/Expander Range Controls the maximum amount of gain reduction applied by the gate/expander. When set to 0, the gate/expander is bypassed. Compressor and Gate Meters The left meter (orange) indicates the amount of compression (attenuation in dB) that is being applied to the signal, and the right meter (green) indicates the amount of gating (attenuation in dB) that is being applied to the signal. Gate/Expander Release Sets how long the signal remains audible after the gate/expander closes, from 0.1 to 4 seconds. This control interacts with the Gate/Expander Range. Expander Button Switches the gate into downwards expander mode with a gentle curve instead of the high ratio gate. Gate/Expander Fast Attack Sets the gate/expander to a fast attack time (100 µs per 40 dB). When off, a controlled linear attack time of 1.5 ms per 30 dB is applied. When gating signal with a steep rising edge, such as drums, a slow attack may effectively mask the initial 'thwack', so you should be aware of this when selecting the appropriate attack time. |
|
Output Section
The Output Section adds additional harmonic saturation with the modelled THAT 2002T 'Blue Can' VCA fader from the 4000 G console - the FADER LEVEL parameter.
This fader controls the output signal of the plug-in and can be driven up to +12 dB to add another colour of harmonic distortion, with an additional 'clean' output trim (OUT TRIM) to compensate for additional gain added at this stage.
The WIDTH & PAN controls (only for plug-in instances with a stereo output) allows for additional mid-side (M/S) width control & panning of the signal. The controls are available in stereo or mono-to-stereo operation only. When the plug-in output is mono, WIDTH & PAN controls will not be present.
When using the VST3 format in supported DAWs the SOLO & CUT are automatically linked to the DAW’s solo and cut controls.
|
Width Default state (1) means is standard stereo operation, and no mid/side processing is applied to the signal. Pan Default state is ‘C’ which means no panning is applied to the signal. Solo Engages channel solo (only available when SSL 360° is running). Cut Engages channel cut (mute). VCA Fader Audio passing through the channel strip can be further driven into harmonic distortion via the VCA-modelled fader. This is a model of the THAT 2002T 'Blue Can' VCA. The non-linear harmonics are level dependent so driving the fader will add more colour. This can then be offset with the 'clean' output trim to compensate for level. Solo Modifiers SOLO SAFE* protects a channel from being muted when another channel is solo'd. This is useful when using the channel strip plug-in on an aux or bus. SOLO CLEAR turns off solo for all channels. *SOLO SAFE only works when the channel strip is connected to the 360° Plug-in Mixer, and using the 360° Plug-in Mixer solo layer. With the exception of Cubase/Nuendo, if using the VST3 format in a compatible DAW, SOLO SAFE will not function. SOLO CLEAR will still function. Sidechain Listen Solos the sidechained signal. Output Trim The digital output allows an extra clean gain stage, post VCA fader. Use this control to compensate for added gain when driving the VCA harmonics with a range of ±20 dB, or to trim the level without destructively affecting your current fader level. |
Routing Menu and Sidechaining
The Routing Menu allows you to configure the processing order of the Filters, EQ and Dynamics processing blocks. Click on the up/down arrows to position that processing element within the overall signal flow.
Please note: EQ > DYNAMICS > FILTER is not possible. In SSL's analogue consoles, the filters will always be attached to the EQ section, unless 'Filter to Input' is activated.
|
Filters to Sidechain Use the 'FILTERS' radio button to move the filters from the input signal path to the sidechain path. EQ to Sidechain Use 'EQ' radio button to move the EQ to the dynamics sidechain. Routing Order Press the up/down arrows in DYN, EQ & FILTERS to reorder the modules. External Side Chain Use the 'EXT' checkbox to feed the compressor sidechain from an external source, routed from your DAW. Check your DAWs documentation on how to route a signal to a plug-in's sidechain input. S/C Listen Indicator The S/C Listen Indicator will light up when S/C Listen is enabled. |
How the Solo System Works
SSL 360° must be installed and running for either solo'ing system described below to work:
1) Compatible VST3 DAWs - Cubase/Nuendo, Live (VST3), Studio One (VST3), REAPER (VST3) & more
When using the VST3 format in compatible DAWs, the SOLO & CUT are automatically linked to the DAW’s solo and cut controls.
2) DAWs without VST3 extension support
In other all other DAWs, the solo feature works by cutting the output of all other 360-enabled channel strip plug-ins in the DAW session. This happens when you action a Solo (either from the UC1, the 360-enabled plug-in, or from the 360° Plug-in Mixer). Therefore, it is recommended that you:
- Insert a 360-enabled channel strip plug-in on all tracks in your DAW session.
- Make sure to engage the SOLO SAFE button on channel strip plug-ins that have been inserted onto auxes/busses/sub-groups/sub-mixes. This will ensure that you hear individual instruments that are routed to these destinations when you start soloing.
SOLO SAFE prevents a channel strip from being cut when another channel strip's SOLO is activated.
Sidechaining
The 'EXT' (External) toggle in the Routing Menu feeds the Dynamics module from an external sidechain, routed from your DAW. Check your DAWs documentation on how to route a signal to a plug-in's sidechain input.
e.g. you could route a kick drum signal to the sidechain input of a plug-in instance on your bass guitar track, and toggle 'EXT' in. This would trigger the compressor on a bass guitar from the kick signal, causing the bass guitar to be 'ducked' when the kick occurs.
The high- and low-pass filters and EQ modules can be moved into the Dynamics sidechain, using the circular toggles in the Routing Menu. The 'EQ' toggle corresponds to 'EQ to Sidechain' and the 'FILTERS' toggle corresponds to 'Filters to Sidechain'.
Advanced Settings
Advanced Settings - Output
Analogue VCA
This option can be set to 'off' to remove the saturation element that is added at the VCA fader output stage.
Width Mode
- Full - the width control affects all frequencies equally
- Low - the width control only affects frequencies below the Width Frequency
- High - the width control only affects frequencies above the Width Frequency
Use this in combination with the Width Frequency control to e.g. only mono frequencies below 120Hz, or only widen frequencies above 10 kHz.
Width Frequency
Determines the frequencies that are affected by the Width control, when the Width Mode is 'Low' or 'High'.
Advanced Settings - Compressor
Auto Make-up
This option can be set to 'off' to bypass the automatic make-up gain in the compressor section. When disabled, you will have to manually trim the level using the Output Trim control.
Auto Make-up Offset
When Auto Make-up is on, the Auto Make-up Offset applies an offset to the reference level used to calculate the auto make-up gain. The reference level is the level at which the input and output levels are the same on the compressor gain curve.
SSL Plug-in Engine
The 'SSL Plug-in Engine' has several features that are available across our entire plug-in range.
NOTE: the available features in a plug-in might be or look different depending on what plug-in you are using, or when the plug-in was most recently updated.
Undo/Redo
SSL plug-ins come with a built-in undo/redo stack, in case your DAW doesn't handle this.
- Undo (left arrow) undoes the current action in the history stack.
- Redo (right arrow) re-does the next action in the history stack.
Presets
All of our plug-ins ship with carefully designed presets to aid your workflow.
Factory presets are included in the plug-in installation, installed in the following locations:
macOS: /Library/Application Support/Solid State Logic/PlugIns/Presets/[Plug-in Name]
Windows: C:\ProgramData\Solid State Logic\PlugIns\Presets\[Plug-in Name]
Switching between presets can be achieved by clicking the left/right arrows in the preset management section of the plug-in GUI, and by clicking on the preset name which will open the preset management display.
The Preset Management menu reflects the folder structure of the preset folder.
Revert Changes and Delete
- Revert Changes discards any changes to the current preset.
- Delete removes the current preset from the filesystem. Factory and Producer presets cannot be deleted from the plug-in GUI, although they can be manually deleted using the filesystem (Windows Explorer or Finder).
A/B and Copy
- A/B allows you to toggle quickly between two presets. This is useful for comparing between two parameter settings.
-
COPY A TO B is used to copy presets between A/B.
Version Number
Click the version number to display more information about the plug-in.
When logging a bug to our support team, always include the full version number e.g. v1.0.13.
Advanced Settings (not all plug-ins)
Some plug-ins have advanced functionality. Click the 'Advanced Settings' button to access advanced plug-in functionality.
This will drop the plug-in into 'Advanced Mode', exposing more settings, and allowing you to tweak the 'under-the-hood' behaviour of the plug-in.
Scale/Zoom
The scale/zoom menu allows you to resize your plug-in from 50% up to 200%.
Note that if resizing would cause the plug-in to go offscreen, then this option will be disabled. This is designed to prevent DAW resizing bugs that exist in some DAWs.
You can also right-click anywhere on the background of the plug-in to change the scale.
HQ or ECO Mode
Some plug-ins come with a HQ or ECO mode button. When in HQ mode, we introduce extra processing such as oversampling for higher quality, at the expense of more CPU. When in ECO mode, a plug-in will drop into a lower, less CPU intensive and low-latency mode (if possible).
Built-in Help
This plug-in features built-in contextual help. To turn this feature on, click the '?' in the bottom right-hand corner. Mouse over elements of the GUI to see some information about the feature.
Click the tooltip to cycle through the pages.